2nd Generation
Note that Pixelcade LCD 2nd Gen has artwork uploader utilities but these are not very reliable and its highly recommended to upgrade to 3rd Gen if you are uploading custom artwork.
3rd Generation
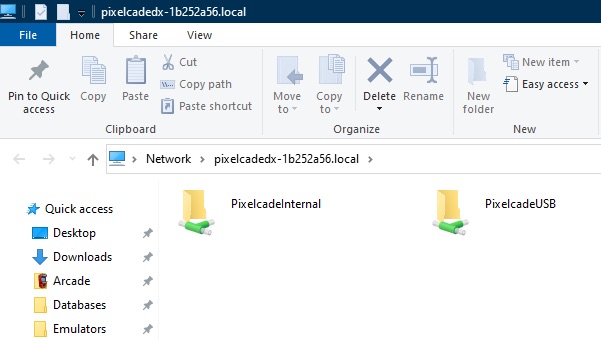
You can copy artwork to an external USB drive directly (faster) or also copy artwork over your network. If copying artwork over your network, click the “Pixelcade LCD Network Share” icon.
![]()
Then select either PixelcadeInternal or your external USB drive (PixelcadeUSB). Note that PixelcadeUSB will not appear if you don’t have an external USB thumb drive plugged in.
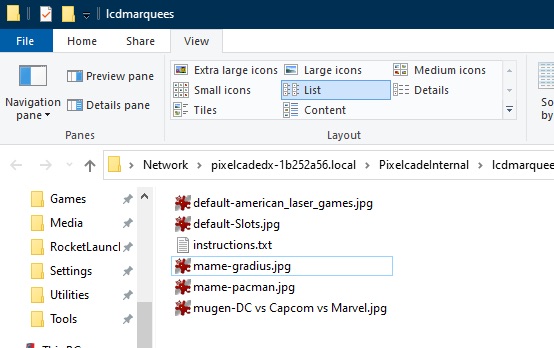
Copy custom marquees into the /lcdmarquees folder and custom video snaps into the /mp4marquees folder. You must follow the file naming convention below.
![]()
File Resolution and Naming Convention
Super Pixelcade LCD artwork should be in .jpg format in 1920 x 360 resolution and Pixelcade LCD artwork should be also in .jpg format in 1280 x 390 resolution. Pixelcade will however resize artwork that is not in the target resolution.
Video snap marquees for Super Pixelcade LCD must be in 1920 x 360 resolution and will not be resized and should be 7 seconds in length and in 1280 x 390 resolution for Pixelcade LCD. Also make sure the bit rate of the video snap .mp4 does not exceed 6Mbps, otherwise the video playback will be choppy.
You must name the files following the naming convention. For example, the game “1941” which has a rom name of 1941, name the marquee file mame-1941.jpg which follows the naming convention: <system/console name>-.jpg. So for example to customize pacman, you would use the file name: mame-pacman.jpg or mame-pacman.mp4 for a custom video snap.
Here are some additional examples:
- mame-galaga.jpg
- mame-milliped.jpg
- microsoft_xbox-Warriors, The (USA).jpg
- genesis-Mega Bomberman (USA).jpg
- amiga-Zany Golf.jpg
- atari2600-Krull (USA).jpg
- atari5200-Space Dungeon (USA).jpg
- intellivision-Congo Bongo (World).jpg
- locomalito_games-Viriax.jpg
Note that for system/wheel or console marquees, the file naming convention is:
default-.jpg
Here are some custom console/console wheels examples:
- default-american_laser_games.jpg
- default-daphne.jpg
- default-Slots.jpg
If you added your own custom marquee to PixelcadeInternal/lcdmarquees and name it for example: custom-myfile.jpg, you can view it with this URL command:
http://<your pixelcade lcd hostname or IP address>:8080/arcade/stream/custom/myfile
For reference, here is the list of marquees, list of system/consoles , and 7s video snaps on Super Pixelcade LCD.
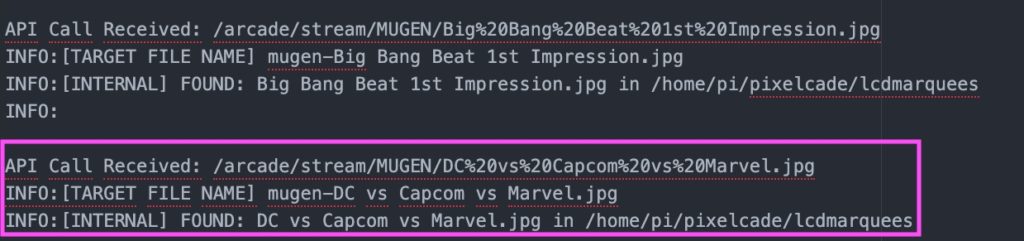
You can also reference the pixelcadelcd.log file which will tell you exactly the file name to use. Access these log files from PixelcadeInternal/log/pixelcadelcd.log
![]()
In this log example, you can see the TARGET FILE NAME is mugen-DC vs Capcom vs Marvel.jpg so create a custom marquee with this file name to customize this particular game marquee.
After uploading a .jpg or .mp4 marquee, you may test it using this URL from any browser connected to the same WiFi network Pixelcade LCD is on.
For example if you uploaded a video snap marquee called newgame.mp4 and an associated .jpg marquee called newgame.jpg, then you would use this URL to test it. Pixelcade should then display the video snap for 7 seconds and then switch to the .jpg marquee.
http://pixelcadedx-xxxxxxx.local:8080/arcade/stream/mame/newgame.jpg
where xxxxxx is the unique ID of your Pixelcade LCD
Important: Don’t forget to add the .jpg extension to the URL when testing.
Note that when uploading custom artwork, your custom artwork WILL NOT show up in the Pixelcade iOS app.
And if you can, please also share your creations with the community on the Pixelcade Art Exchange.
![]()