
Pixelcade LCD User Guide
How to install your Pixelcade LCD marquee, connect it to your network and arcade computer, and set it up with Pixelcade Companion.
1. How Pixelcade LCD works
A Pixelcade LCD marquee is a widescreen LCD with a small computer built in. It stores its own artwork, including video marquees, and runs its own copy of Pixelcade Companion.
It works with the Pixelcade software on your arcade computer:
- Your front end tells the Pixelcade software on the arcade computer which system and game you've selected.
- The Pixelcade software passes that on to the LCD, over a USB cable or over your home network.
- The LCD shows the matching marquee: a video if one exists, otherwise a still image.
You can use an LCD on its own, or together with a Pixelcade LED marquee and Pixelcade Sidekick displays. See the Pixelcade LED User Guide.
Both Companions are web pages, so nothing extra needs to be installed to use them. They're also available as a free app for iPhone and iPad and Android. It's the same Pixelcade app for LED and LCD.
2. Before you start
You'll need:
- Your Pixelcade LCD marquee. It comes as a mount for a specific arcade cabinet, or as a kit:
- Pixelcade LCD: 21", 24" or 28" screen, all 1920 × 360 resolution
- Pixelcade LCD kit: for your own LCD screen, which must be 1920 × 360 or 1280 × 390 resolution. The kit can also turn an AtGames BitLCD into a Pixelcade LCD marquee.
- A way to power it: the Pixelcade SATA power cable or a 12V, 5A power supply (see section 3)
- An arcade computer running a supported front end. The platforms are the same as for Pixelcade LED: Windows (LaunchBox / BigBox, HyperSpin, GameEx, Arcade One, Core Type R), Batocera, RetroPie, Recalbox, EmuELEC, and AtGames Legends Ultimate with R-Cade / Legends Unchained.
- A home network (WiFi or Ethernet), recommended, for widgets, RetroAchievements and updates
- The free Pixelcade app on your phone, to connect the LCD to WiFi: iPhone / iPad or Android
3. Connect the hardware
- Mount the LCD in your cabinet's marquee area. See pixelcade.org/lcd for mounting information.
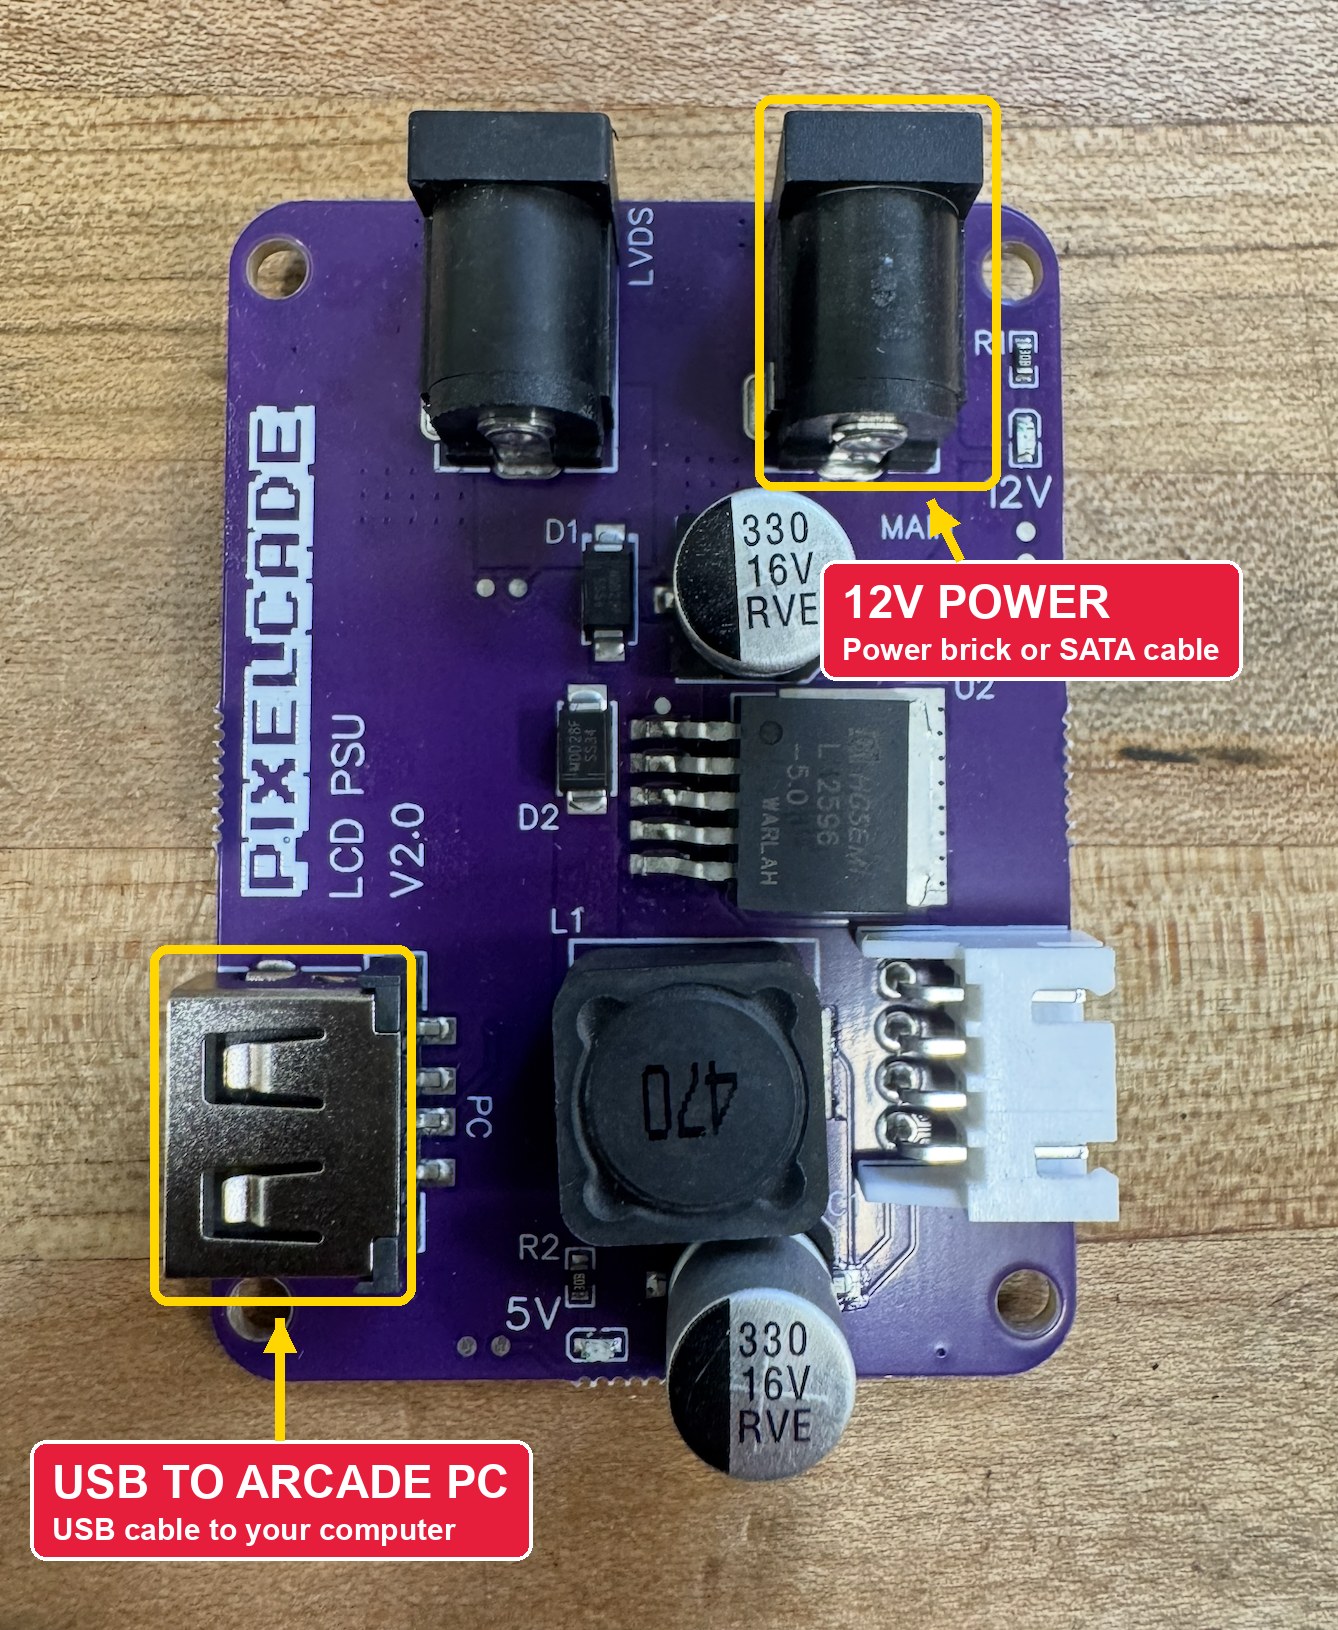
- Connect power to the 12V jack on the Pixelcade LCD power board (marked MAIN, see the photo below). There are two options:
- Pixelcade SATA power cable (recommended for PC cabinets). Plugs into a spare SATA power connector from your PC's power supply. Your LCD then turns on and off automatically with your PC.
- 12V, 5A power supply. For systems without a PC power supply, such as a Raspberry Pi or another single-board computer.
- Connect the LCD to your arcade computer. Use a USB cable from the USB port on the power board (marked PC) to a USB port on your arcade computer. No drivers are needed. It's plug and play, including on Windows. If the LCD and the arcade computer are on the same home network (WiFi or Ethernet), the USB cable is optional.
When the LCD starts up, it shows Searching for network… while it looks for a connection. If it finds no WiFi, Ethernet or USB connection, it shows the WiFi setup screen (see the next section).
4. Connect the LCD to your network
Every Pixelcade LCD can connect in three ways. You can use more than one at the same time, for example USB to the arcade computer plus WiFi for internet.
| Connection | Internet? | Notes |
|---|---|---|
| USB | No | Connects the LCD directly to your arcade computer. Plug and play, no drivers needed. Game marquees work, but the LCD has no internet access. |
| WiFi | Yes | Set up with the Pixelcade mobile app, or from LCD Companion (see below). |
| Ethernet | Yes | Every Pixelcade LCD has an Ethernet port. Plug in a network cable and it connects automatically. |
- Widgets that use online data (sports, weather, news, stocks, Spotify, Google Photos and most others)
- RetroAchievements
- Firmware and artwork updates from LCD Companion (a USB-only LCD can still be updated by following pixelcade.org/lcdgen3)
Connect to WiFi
There are two ways to set up WiFi:
Option 1: from the arcade computer, while connected by USB
- On the arcade computer, open
http://169.254.100.1:8080in a web browser. This is LCD Companion, reached over the USB cable. - Go to Settings → WiFi & USB, choose your network from Available Networks, and enter the password.
Option 2: with the Pixelcade mobile app
- Unplug the USB cable from the LCD (if it's connected) and power the LCD on. With no network connection, it goes into setup mode and shows WiFi Setup Required with a QR code.
- Scan the QR code to download the Pixelcade app, or get it from the App Store or Google Play.
- Open the app and follow the WiFi setup wizard. In setup mode, the LCD creates its own WiFi network called
Pixelcade-LCD-Setup-XXXX, which the app uses to send it your WiFi details. - Plug the USB cable back in once WiFi is connected.
To change WiFi networks later, use Settings → WiFi & USB in LCD Companion. Forget the current network to put the LCD back into setup mode.
5. Set up your arcade computer
Your front end talks to the Pixelcade software on your arcade computer, which then talks to the LCD. Front ends never talk to the LCD directly. So the Pixelcade software needs to be installed on the arcade computer, even if you don't have an LED marquee.
- Install the Pixelcade software for your platform. Windows: pixelcade.org/download-pc (it includes LEDBlinky, which all Windows front ends need). For Batocera, R-Cade and other systems, see Download on pixelcade.org.
- Open the arcade computer's Companion at
http://localhost:8080on the cabinet, and go to Settings → Pixelcade LCD. - Turn on LCD Marquee. The Pixelcade software finds the LCD automatically, over USB or on your network. This page shows the LCD's host name, IP address and firmware version once it's found. If it isn't found, enter the LCD's host name or IP address here yourself.
- No LED marquee? Go to Settings → General and turn on No Pixelcade LED Marquee Connected.
- Check your front end under Settings → Front End Setups, and fix anything marked with a red X.
6. Open LCD Companion
LCD Companion is served by the LCD itself on port 8080. Open it in a web browser, or in the Pixelcade mobile app:
| From | Address |
|---|---|
| A phone, tablet or computer on the same network | http://pixelcadedx-xxxxxxxx.local:8080or http://<LCD IP address>:8080 |
| The arcade computer, when the LCD is connected by USB | http://169.254.100.1:8080 |
Each LCD has its own name, starting with pixelcadedx-. You'll find the LCD's host name and IP address in the arcade computer's Companion, under Settings → Pixelcade LCD.
.local addresses don't work on your network (some Windows PCs and Android phones don't support them), use the IP address instead.7. Using LCD and LED together
With both an LCD and an LED marquee, each game shows on both. In the arcade computer's Companion, under Settings → Pixelcade LCD:
- Show Widgets on LCD Only: by default, widgets and Pixelcade Attract Mode run on both marquees. Turn this on to keep widgets on the LCD and leave the LED marquee free for game artwork.
- LCD Connect Delay: on startup, waits before searching for the LCD. Useful if your LCD takes longer to start than your arcade computer.
LCD Pulse Sync (arcade computer's Companion, Settings → General): if you have a Pixelcade LED board driving Pixelcade Pulse LED strips and extra displays, but no LED marquee, this lets the LCD drive them. Widgets and Attract Mode are then managed from LCD Companion. It's on by default when No Pixelcade LED Marquee Connected is on.
8. A tour of LCD Companion
| Tile | What it does |
|---|---|
| Browse Marquees | Browse every marquee by system and show any of them on the LCD. |
| Pixelcade Attract Mode | A playlist of marquees and widgets that cycles while your cabinet is idle. |
| Widgets | Live info on your LCD: sports, weather, music, photos, clocks and more. |
| Upload Custom Artwork | Add your own image and video marquees. |
| Text | Show your own message on the LCD. |
| Default Marquee | Choose what the LCD shows when no game is selected. |
| Settings | All LCD configuration, organized into tabs (see section 14). |
| Log | The LCD's activity log. You can filter it, clear it, and share it from the mobile app. |
| System | Reboot or shut down the LCD, and check for updates. |
9. Browsing marquees
Open Browse Marquees, pick a system, and tap a marquee to show it on the LCD right away. Use the video filter to see only video marquees.
Tap a marquee's info button to:
- Add it to Pixelcade Attract Mode
- Replace it with your own image or video
- Create an alias: use this marquee for another game name, or for a game under a different system name
- Delete a marquee you added. The LCD then falls back to the system marquee.
To change the look of the system and console marquees, choose a theme under Settings → Themes.
10. Your own artwork and USB storage
Upload Custom Artwork
Open Upload Custom Artwork, choose a system (or create your own), and upload images or videos.
- Naming: files are named
system-gamename, for examplemame-pacman.jpg,mame-galaga.pngornes-mario.mp4. If you choose a system first, the prefix is added for you. - Images: resized automatically to your screen's resolution. PNG files are converted to JPEG.
- Videos (MP4): not resized, so make them at or close to your screen's resolution. About 7 seconds is recommended. Keep the bitrate at 6 Mbps or lower to avoid choppy playback.
- Custom systems: deleting a custom system also deletes all of its artwork, and this can't be undone.
| Screen | Resolution |
|---|---|
| Pixelcade LCD (21", 24" and 28") | 1920 × 360 |
| Pixelcade LCD kit with your own screen | 1920 × 360 or 1280 × 390 |
| AtGames BitLCD (converted with the kit) | 1920 × 1080 |
The resolution is set under Settings → General → Screen Resolution.
USB storage
Plug a USB drive into the LCD to add more marquee storage. Marquees on the USB drive take priority over internal storage. Manage it under Settings → WiFi & USB:
- If the drive isn't set up for Pixelcade yet, Companion offers to format it. This erases the drive.
- Use Eject before unplugging the drive.
11. Text and the default marquee
Text: type a message, pick a font and color, and send it to the LCD.
Default Marquee: choose what the LCD shows on startup and when no game is selected. Builders' cabinets can set their own default logo under Settings → Branding.
12. Widgets
Open Widgets and tap a widget to start it. Each widget has its own settings page, which explains what the widget does. Settings save automatically. Widgets marked Requires Internet need WiFi or Ethernet.
| Category | Widgets |
|---|---|
| Sports | Sports scores (add several, each with different leagues), Yahoo Fantasy, F1 Dashboard |
| Time | Clock (Pac-Man, Space Invaders, Tetris, Galaga, Donkey Kong, Retro CRT and more), World Clock, Countdown, Google Calendar, Google Tasks |
| News and markets | News, Stocks & Crypto |
| Weather and the world | Weather, Earthquake Monitor, Planes Overhead, Commute traffic, Horoscope |
| Music, video and photos | Spotify, Last.fm, Last.fm Stats, YouTube channel stats, Twitch, Plex, Emby / Jellyfin, Netflix Top 10, What to Watch, Google Photos |
| Retro gaming | Retro Trivia, This Day in Retro, RetroAchievements, Last Game Marquee, AI Marquee |
| Other | Recipes |
13. Pixelcade Attract Mode
Pixelcade Attract Mode is a playlist of marquees and widgets that cycles when nobody is playing. A default playlist is included.
- Add marquees from Browse Marquees, and add widgets from the playlist page. You can add several clock faces or sports tickers.
- Drag items to reorder them, and set how long each one stays on screen. Turn on shuffle to play them in random order.
- Turn on the attract mode option to keep the playlist running even when games are selected or launched.
To start Pixelcade Attract Mode automatically with your front end's screensaver, use the arcade computer's Companion: Settings → Attract Mode.
14. Settings reference
| Tab | What's there |
|---|---|
| General | Firmware and artwork versions; network, pairing and storage status; timezone (used by the clock and the log); screen resolution (pick your model, or enter a custom resolution); shared API keys. |
| WiFi & USB | Connect to or forget a WiFi network; USB drive status, format and eject. |
| Behavior |
Static Marquees Only: skip video marquees. Loop Video Marquees Indefinitely: keep videos playing instead of ending on the still image. Disable Splash Screens: on game launch and high scores, only an LED marquee or a Pulse dot-matrix display shows the scrolling text. Show Marquee Overlays: show high scores in a small bar at the bottom of game marquees. Fuzzy Matching: also match artwork whose name has a small spelling difference. Differences in case, punctuation, or tags like (USA) or (World) always match. Show Alt Marquees: show a game's alternate marquee when one exists. |
| Pulse Sub-Displays | The type of Pixelcade Pulse mini displays (7-segment, dot matrix, mini LCD or OLED) connected to the LCD. |
| Themes | The theme for system and console marquees, such as Chroma. Use refresh after an artwork update. |
| Custom System Mappings | Opens the arcade computer's Companion, where custom system mappings are managed. |
| In Game Effects | Opens In Game Effects settings in the arcade computer's Companion. |
| Pixelcade LED Settings | Opens the arcade computer's Companion. |
| Branding | The cabinet builder's branding profile, which sets the default startup marquee. |
| Support | Your full setup on one page, to share in the Pixelcade Discord #support channel. |
15. In Game Effects
With In Game Effects, the LCD plays animations during supported games, such as explosions, coin and start-button effects, RetroAchievements unlocks, and game-specific animations like the Galaga tractor beam. They're powered by DOFLinx, which runs on your arcade computer. They work on an LCD on its own or alongside an LED marquee.
Set up In Game Effects in the arcade computer's Companion, under Settings → In Game Effects. Supported platforms are Windows (select MAME games), and Batocera, R-Cade and Recalbox (games on the FBNeo wheel). More information: pixelcade.org/doflinx
16. Keeping your LCD up to date
Open System in LCD Companion to check for updates. The page shows your current firmware and artwork versions and the release notes. You can install the latest stable update, or the beta. A progress bar shows while it updates.
- Artwork updates are incremental: only new or changed marquees are downloaded.
- Updates need WiFi or Ethernet. A USB-only LCD can still be updated by following pixelcade.org/lcdgen3.
The Pixelcade software on your arcade computer is updated separately, from the Updates tile in its own Companion.
17. Troubleshooting
The LCD doesn't change when I select a game
- In the arcade computer's Companion, check Settings → Pixelcade LCD. LCD Marquee should be on, and the LCD's host name or IP address should be listed.
- Check Settings → Front End Setups there too, and fix anything marked with a red X.
- If the LCD is on WiFi, make sure it's on the same network as the arcade computer, not a guest network.
- If the LCD starts more slowly than your arcade computer, raise LCD Connect Delay.
The LCD shows "WiFi Setup Required"
The LCD has no network connection. Set up WiFi with the mobile app (section 4), connect an Ethernet cable, or connect it to the arcade computer by USB.
Video marquees are choppy
For videos you added yourself, re-encode them at 6 Mbps or less, at your screen's resolution. If you prefer still images, turn on Static Marquees Only under Settings → Behavior.
I can't open LCD Companion
- Use the IP address instead of the
.localname. - From the arcade computer with a USB-connected LCD, try
http://169.254.100.1:8080.
Contacting support
- Open Settings → Support in LCD Companion and copy the information. Share the Log too. The mobile app has a share button for it.
- Post them, along with a description of the problem, in the
#supportchannel on the Pixelcade Discord.
18. Advanced: the URL API
The LCD accepts the same kind of web requests as Pixelcade LED, on port 8080 of the LCD. In most setups your front end goes through the Pixelcade software on the arcade computer, which forwards requests to the LCD. You only need to call the LCD directly for your own scripts.
| Request | What it does |
|---|---|
/arcade/stream/<system>/<game> | Shows the marquee for a game, e.g. /arcade/stream/mame/pacman |
?novideo / ?nogif | Added to /arcade, shows a still image instead of a video |
?nomini / ?clearmini / ?minilcdonly | Added to /arcade, controls what's sent to Pulse mini displays |
/defaultmarquee | Goes back to the default marquee |
Example:
curl "http://pixelcadedx-xxxxxxxx.local:8080/arcade/stream/mame/pacman?novideo"The full list of requests, including LCD-only effects, is in the Pixelcade API documentation.
Back to top ↑